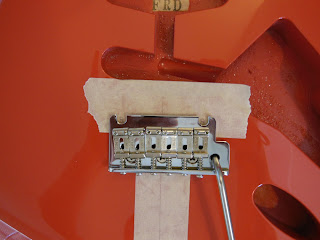
I finally installing the tremolo today, and I now have the bare minimum for a playable guitar.
I spent about an hour calculating center lines for the neck and body so that I could use a template that came from Stew Mac in order to mark the drill hole locations.
I made sure to measure a couple of times to be completely sure the locations would be correct (only 1 chance to get it right). The first pair of drill hole locations came from the template, which used the body routes as a reference point. However, when I checked back using the neck and nut as a reference, it turned out that the holes would be way too close to the nut, by about 3-4 mm. It might seem very trivial, but 3-4 mm is more than enough to prevent proper intonation (an older guitar I own had the bridge drilled about 3 mm too close to the neck, and would sound out of tune after the 5th fret on the higher strings).

I made sure to check the approximate position of the tremolo bridge once installed to the correct pivot post positions to make sure that the correct 25.5 inch length for the high E string had been achieved.
Once the high E string's distance from nut to bridge was about 25.5 in, I put some strings (high E and low E) into the bridge, passed them through the tuners, and checked string spacing one more time. Once everything looked good, I proceeded to drill. I used a small drill bit first to mark the center points of each hole.
The next step was drilling the actual hole. I used a 3/8 inch doweling jig to make sure the drill bit went in straight. The jig hole was an extremely tight fit for the 3/8 inch brad point bit I had, and when I reversed the drill, it would unscrew the insert. Small annoyances aside, I was relieved when I finally finished the drilling, because this particular piece of the build had been making me nervous more than any other piece.
I had a moment of panic when I double-checked by putting a template on top of the drill holes and they didn't seem to match up. However, when I mounted the tremolo and actually measured the lengths and checked the string spacing, I realized that my extra calculations and measurements relative to the neck were more accurate than the template.
Finally with all the strings on:
The tremolo looks pretty clean.
The neck to body connection looks pretty solid. I didn't have a chance to get good pictures in sunlight right after I mounted it, because it had gotten too dark.
There's a tiny bit of a gap towards the heel of the neck and the neck pocket, but I've seen a lot worse on other guitars.
The string spacing looks good.
Now that the neck has been mounted and the tremolo has been installed, this is the bare minimum required to be able to play notes. After putting on the strings, I tuned up and did a bit of testing. All of them are able to produce notes, but some are dead when fretting the note on the fingerboard. That's a good sign that the neck in relation to the bridge is not too high or too low. The notes sound clear and very resonant, and I think it'll sound very good once it's completely done. Over this next week, I'll slowly let the neck get acclimated to the string tension, and then do some more detailed setup work (any possible truss rod adjustment, bridge saddle heights, intonation). I'll have to remove the strings again at some point (to install the pickguard/electronics and also to remove the layer of finish from off the frets, but I want to get the setup in the ballpark so I can verify that nothing drastic needs to be changed.
With this weekend over, I think the Stratocaster is about 3/4 of the way done. I'll be getting the pickups and a nice case for it sometime this week, and I'll begin working on the electronics possibly the next weekend.


No comments:
Post a Comment