Thursday, July 25, 2013

More Parts

I finally got some more parts earlier in the week.

Bridge tremolo parts:

Clockwise from top: tremolo bushings, tremolo pivot posts, tremolo spring claw, springs, spring claw screws (actually neck screws but they can be used for the claw).

Sorry for the blurry shots. I'm going to get a tripod soon for better shots and also so I can take better video of me doing some of the work. I also didn't take anything out of the bags yet because I know I'm going to be playing with the parts when I get bored, and I know that's a great way to misplace them.

What I'll need to do is to drill 2 3/8 inch holes into the body, and then press the bushings in. Afterwards, I can screw the posts in and then put the bridge assembly on. The claw, springs, and screws will anchor in the back of the body and keep tension on the bridge. When I get to installing it, I'll show each different part in more detail.

I'm trying to think about how I'm going to determine where to drill the holes, and I've got a couple of ideas. I think I'll measure the neck and body in a couple of different places and then establish some center lines on some masking tape. Once I've done that, I can align the neck and body using the center lines so that the neck fit will be good. I do have the tremolo routing template from StewMac, and I can use the center lines in the template to find where I need to drill. I can use this to check against the neck/body center line method as well. The annoying thing about the 2 pieces (neck, body, bridge) is that I sort of need the neck and body to get the bridge distance from the neck to be correct, but I need the bridge and body to align the neck to be straight, and I need the bridge and neck to ensure my drill holes are in the right place. I'm a software engineer, and this is why I hate circular dependencies. I'll need a lot of masking tape, measuring, squaring, and clamping to get the tremolo installation just right.

Moving on...

Plastic and mounting parts:

Clockwise from left: white Stratocaster pickguard (3-ply, white-black-white, non-aged white color), white switch tip, white volume and tone knobs, strap buttons and screws, pickup height tubing, pickup and switch screws.

I wanted straight white since I think the aged white look would be a bit weird on what will essentially be a modern-style Stratocaster. I want to reserve the vintage look in a future build. The volume and tone knobs do look slightly off-white even though the part number seems to indicate its the straight white color. It's still a pleasant look, however:

Finally, the electronics parts (and the neck plate + screws):

Clockwise from top: output jack plate, output jack, no-load tone pot, 0.022 μF Orange Drop capacitor (purdy!), grounding lug, blank neck plate and screws.

The no-load tone pot goes from 0-9 (the knobs start from 1, but I count from 0), and after a click, at 10, lets the full signal through. I intend to wire the far tone pot to affect both the middle and bridge pickups, but I want an option to be able to play the bridge pickup without any tone control on it. Traditional Stratocaster wiring has the first tone knob affecting the neck, the second tone affecting the middle, and nothing affecting the bridge. Coming from humbuckers, I prefer a slightly mellower sound and I want to be able to roll off the treble on the bridge pickup (the brightest sounding one) to be able to find a wider range of tones. At the same time, I want to be able to take the tone control out and get the traditional tone as well.

I did some more sanding of the bridge pocket over the weekend, and I still have a bit more left to be able to get the neck to fit properly. I'm working very slowly to minimize mistakes. I'm probably not going to do anything after the sanding for a while, because although I've gotten most of the mounting parts for the things I want to do next (neck attachment and tremolo bridge installation), I forgot 1 crucial component, which is lubrication for the screws. I know I can use soap to lube the screws (to prevent anything like breaking them inside the wood while I'm cutting threads, etc) but I happen to really hate the smell of soap along with wood. I'm getting a batch of special screw wax delivered to me, but it might take a week. For now, I'm going to sit tight and order any other parts I need slowly.

Thursday, July 18, 2013

Tremolo Bridge

I finally got my newest shipments of goodies today.

Before I looked at the guitar stuff, I wanted to make some dinner.

The first package contained a bottle of hot sauce that I've been wanting to try for a while: Dave's Gourmet Scorpion Pepper hot sauce.

I'm a big fan of their Ghost Pepper sauce, which is really good but extremely spicy. I believe scorpion peppers are the hottest in the world now, hotter than the ghost pepper (which was the hottest a couple years ago). A couple of my pepperhead friends and I enjoy spicy foods, and I ordered a couple bottles so we each could have one.

Before reviewing the remaining items from the packages, I cooked up a couple of hot dogs for a quick dinner:

I didn't hold back on the Scorpion Pepper sauce (the orange bits on top of the ketchup). It really has an intense sting! It's got a similar consistency to Sriracha hot sauce (the chunkier chili garlic one) and has a slightly sweet, fresh pepper flavor that delivers extreme heat very quickly (where the Ghost Pepper sauce is smooth like ketchup and delivers an intense slow burn after its initial fruity, more processed flavor). Highly recommended if you like extreme hot sauces, but definitely not for the faint of heart (or weak of bowels).

Onto the guitar stuff then...

I got The Fender Stratocaster Handbook by Paul Balmer. It's got a bunch of information on maintenance and setup, and I figure having more material to look at while I continue the build will make me avoid any problems. I'm also trying to get some ideas and detailed specs on vintage Strats; once I finish this build and if it turns out well, I might think about a future build where I build something close to the vintage stuff (my current build is going to be a modern workhorse type of design).

Here's the part that has kept me waiting for over 2 weeks...the tremolo bridge!

It's only the core part of the complete bridge assembly. Fender has been constantly changing the specs on its guitars ever since the first Strats were released. For this build, I wanted an American Standard type tremolo with the 2-pivot bridge posts, but Fender switched the design a bit a couple of years ago. I wanted the newest designed assembly but couldn't find any place that was selling the complete assembly. Most places only offered the upgrade unit (only the changed parts) intended for replacing already existing Strat tremolos. My solution was to order the upgrade unit and then source all the other parts myself. I priced everything out and realized I'd save a bunch of money this way rather than buy the old assembly plus the new upgrade or buying the new assembly complete, directly from Fender (waaaaay overpriced). Another difference is the fact that the American Standard spaces its outer strings 2 1/16 inches apart, compared to the vintage spacing of 2 7/32 inches. I'm more familiar with the Superstrat (rock/metal Stratocaster-inspired guitars that have a lot more modern specs focused on playability) and therefore, I prefer the narrower spacing, which is another reason why I chose to go with the American Standard tremolo.

When I ordered the upgrade unit, I wasn't sure which parts I'd actually receive and which parts would be missing. Now that I've gotten the unit, I can order all the rest of the parts before. When I've gotten all the rest of the tremolo parts, I'll have enough to be able to drill the posts to mount the tremolo, and also to mount the neck to the body. That's probably the most critical part of the build because the alignment of the neck with body/strings/bridge, alignment of the bridge mounting locations need to be done together to make sure everything fits and will intonate correctly. If I screw up the tremolo positioning, it'll affect the neck alignment, whether or not I can ever get the guitar intonation right, and pretty much whether the guitar will work. I can always plug and redrill, but I'd much rather get it right the first time, especially since the body is so nice. Once I have neck + body + bridge, I'll have enough to be able to put strings on it and begin the setup process.

Shiny...

...Metal...

...Parts...

...♥

The Fender American Standard bridge is fundamentally different in design to the vintage design because of how the plate mounts to the guitar. The American Standard bridge has 2 pivot holes rather than the traditional 6 screw holes (1 for each string) to reduce friction. The guitar trem is like a lever that can be pressed down to move the strings and change the pitch of the notes. The problem with the older vintage design is that the 6 screws can cause a lot more friction as each screw might bind on the tremolo action. With too much friction, the strings have a hard time getting back to the correct tuning. The 2 pivot design is supposed to reduce friction and allow the strings to get back into pitch more accurately.

Bent steel saddles.

The bridge block. This thing is surprisingly heavy. It's got a bevel so that when using the tremolo, there's a bit more room to continue to push the tremolo arm down without the block hitting the inside cavity of the body.

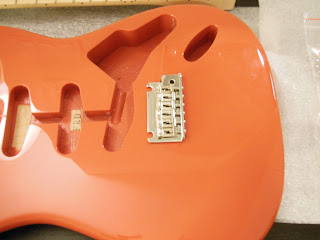
A reminder of what the body looks like:

Just putting the tremolo unit in to show where it'll be once I install it.

Thursday, July 11, 2013

Patience Is A Virtue...

The feeling of waiting on a new shipment...

If there was no way to track where your package is, then there would be a lot more surprises and a lot fewer impatient finger-taps...

...But at least I know some goodies are on their way!