Sunday, June 7, 2015

Stratocaster #2: 1962-Spec Olympic White

I've decided that it's time to build a new Strat.

The Fiesta Red one has been serving me quite well for the past two years, and it was a very nice mix of modern American Standard Strat specs along with some more vintage-y things on it. However, I've always been drawn to the idea of building something a bit closer to a 60s style vintage Strat, and this project will fill that purpose.

This particular build is going to follow the specs of a 1962 Stratocaster with an Olympic White body and slab rosewood fingerboard. I've decided to go all Warmoth this time (as opposed to an Allparts body like I did last time) due to finding a good price, a good weight (body is 4 lbs exactly), and the smaller chance that I'll have to do any neck pocket sanding (like on the Fiesta Red Strat) since both parts come from the same maker. I've got to say the paint job is superb on the Warmoth body (just around the same quality as the Allparts one) and there's not much difference in quality between the two, so it just comes down to a matter of preference.

Body specs:

  • Warmoth vintage Stratocaster body.
  • Olympic White finish.
  • 4.0 lbs.

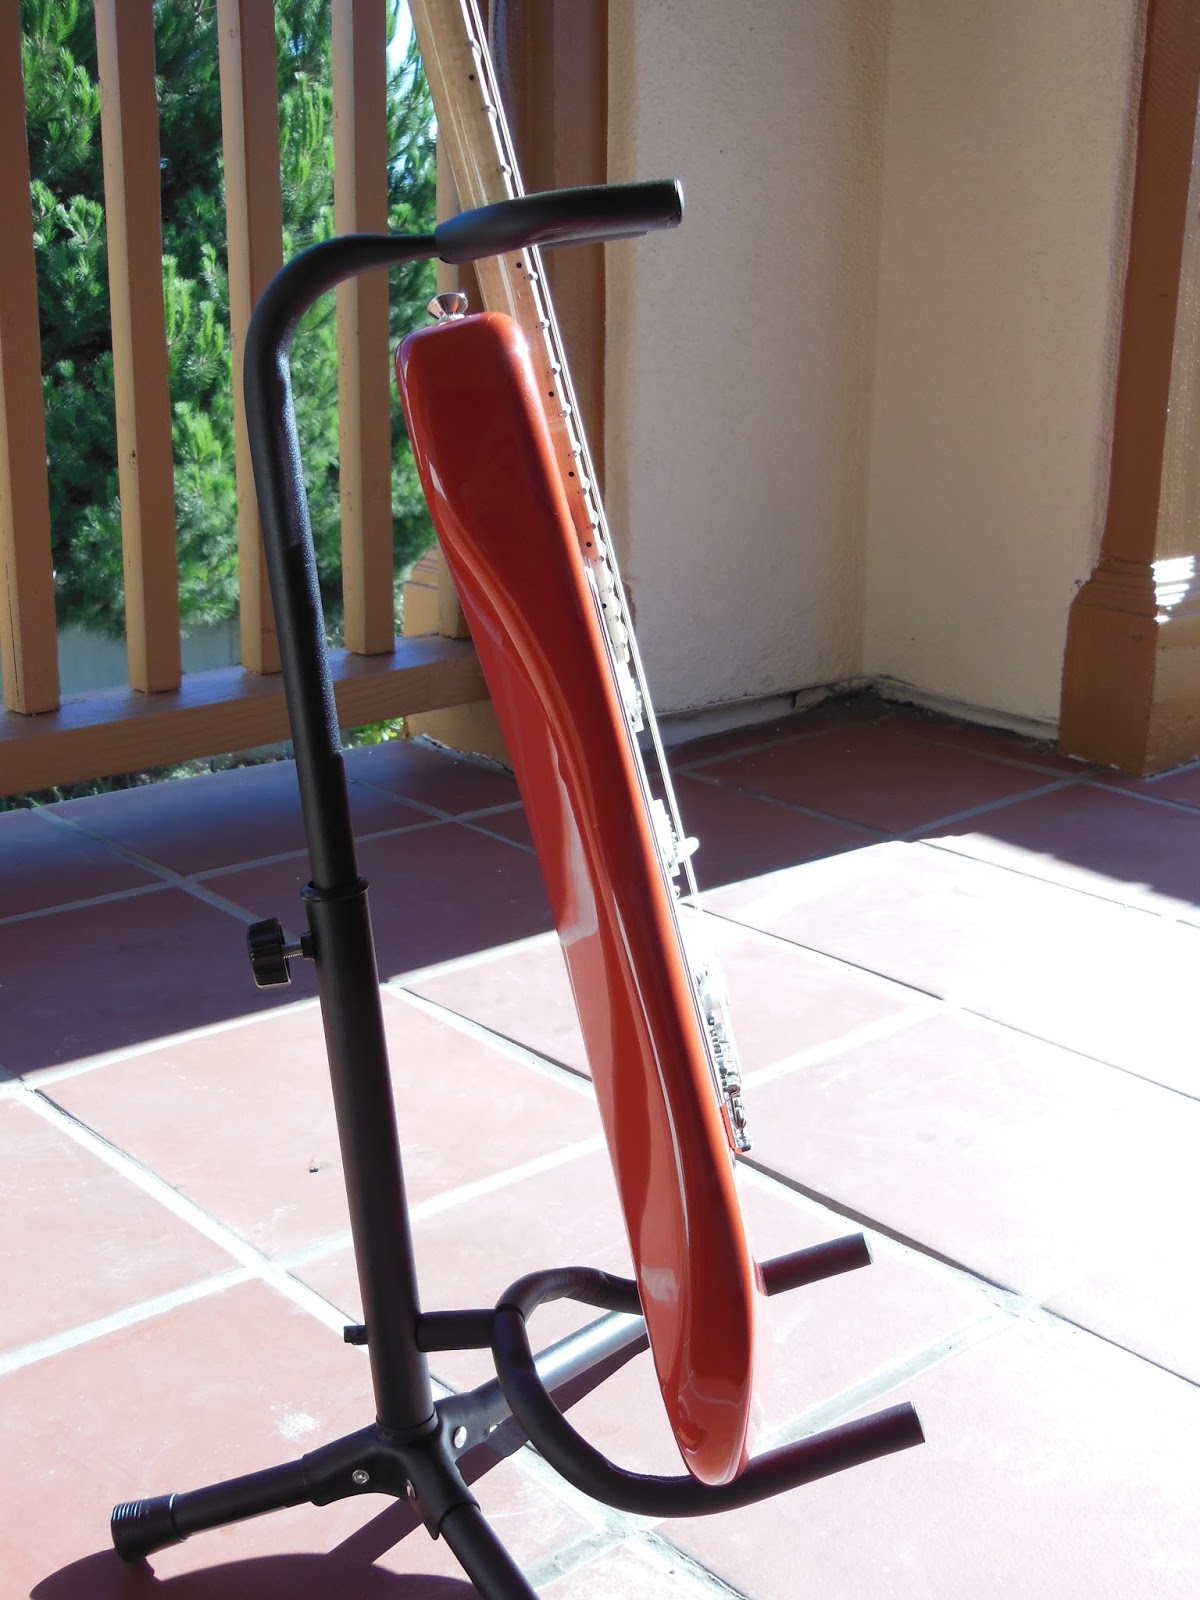
The Olympic White finish is just a slight off-white that's very pleasing, especially in the sunlight:

The neck pocket is very clean and I probably won't need to do any sanding here:

The routed cavities are at the vintage depth of 5/8" as opposed to 3/4" for modern American Standard Strats. Warmoth has an option for ordering a modern Strat style body or a vintage Strat style body. The differences are in the deeper contours and the shallower routs of the vintage. The Allparts body on the Fiesta Red has the same deep contours but splits the difference in the rout depth, as it was right in between 5/8" and 3/4" when I was building the Fiesta Red Strat.

I intend on putting some Dimarzio Areas in this guitar (since I loved the Dimarzio Area 58, 67, 61 set that I put in the other one), and I'm hoping there's enough depth due to the Area pickups being stacked coils and therefore slightly taller than vintage pickups. We'll see what happens!

Neck specs:

  • Warmoth total vintage construction (truss rod adjustment is at the heel of the neck rather than the headstock). The truss rod setup will make it slightly harder to adjust since the neck must be removed from the body before it can be touched. This is in contrast to the Fiesta Red Strat which has the truss rod adjustment near the headstock. However, that neck turned out to require no adjustment at all, and I'm hoping for the same case here.
  • Slab rosewood fingerboard on maple neck. Slab fingerboards were introduced to the Strat in 1959 and gave way to the veneer fingerboard roughly in 1963. The difference is that the slab is cut flat where it's glued to the maple neck, whereas the veneer's bottom is curved along with the curvature of the fingerboard radius. Not many aftermarket neck makers actually do veneer fingerboards, but luckily I'm doing this with 1962 specs in mind.
  • Vintage nut width: 1-5/8" (compared to American Standard 1-11/16").
  • Skinny and tall frets (6105). Not vintage (shallow) because I want just a bit more life out of these frets. I would have been OK with 6150s (medium jumbo), but this neck was on sale and happened to have 6105s, so I'm happy.
  • Vintage 7.25" fretboard radius (compared to American Standard 9.5"). This is rounder and easier for stuff like barre chords, harder to bend without choking the note. Compromises, compromises.
  • Vintage number of frets (21, compared to American Standard 22).
  • Standard thin C neck back profile.

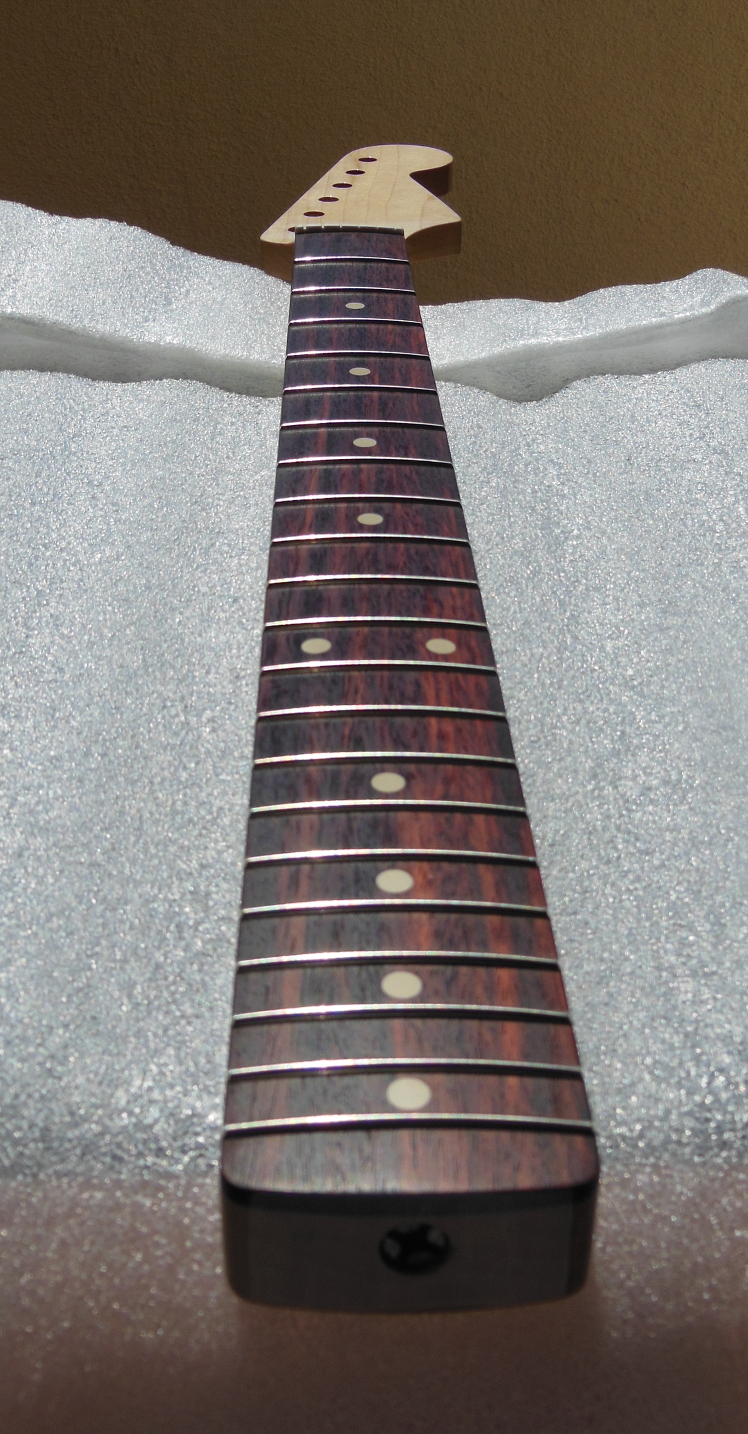
I love the contrast between the dark rosewood and the light maple underneath:

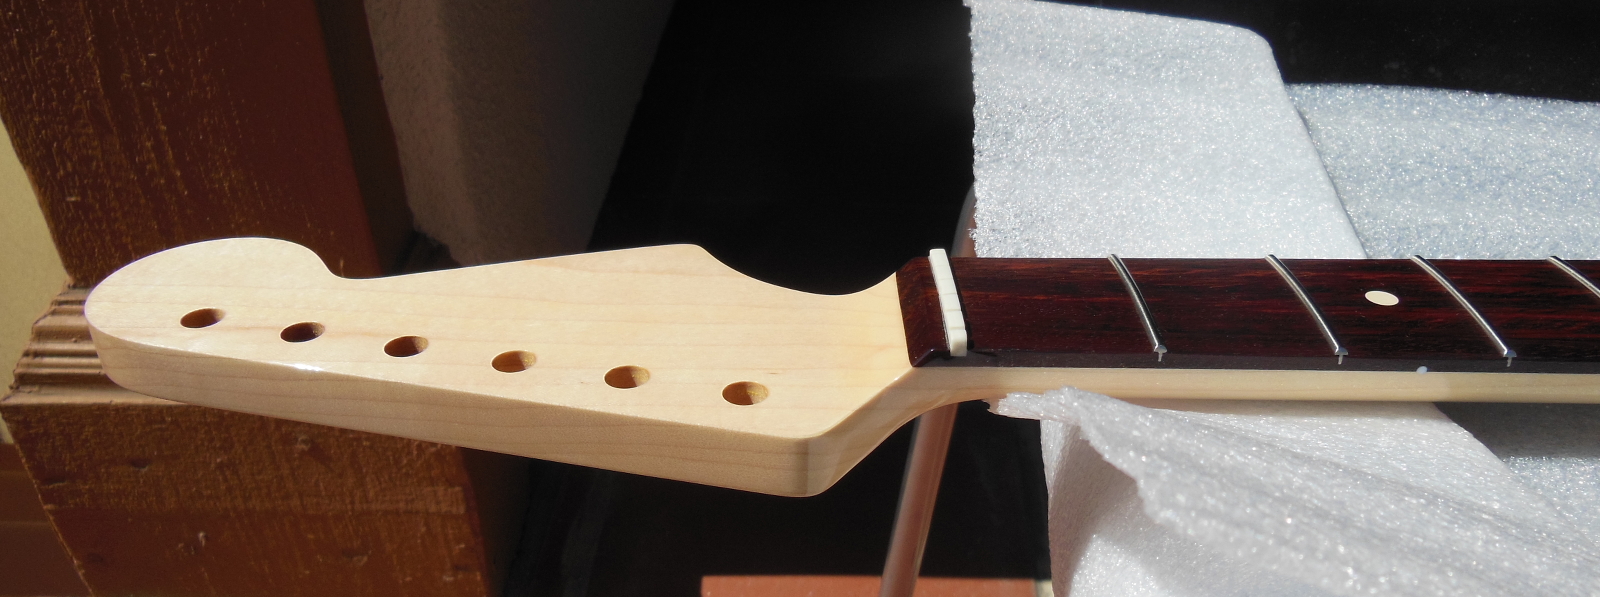
The truss rod adjustment nut is clearly visible at the neck's heel:

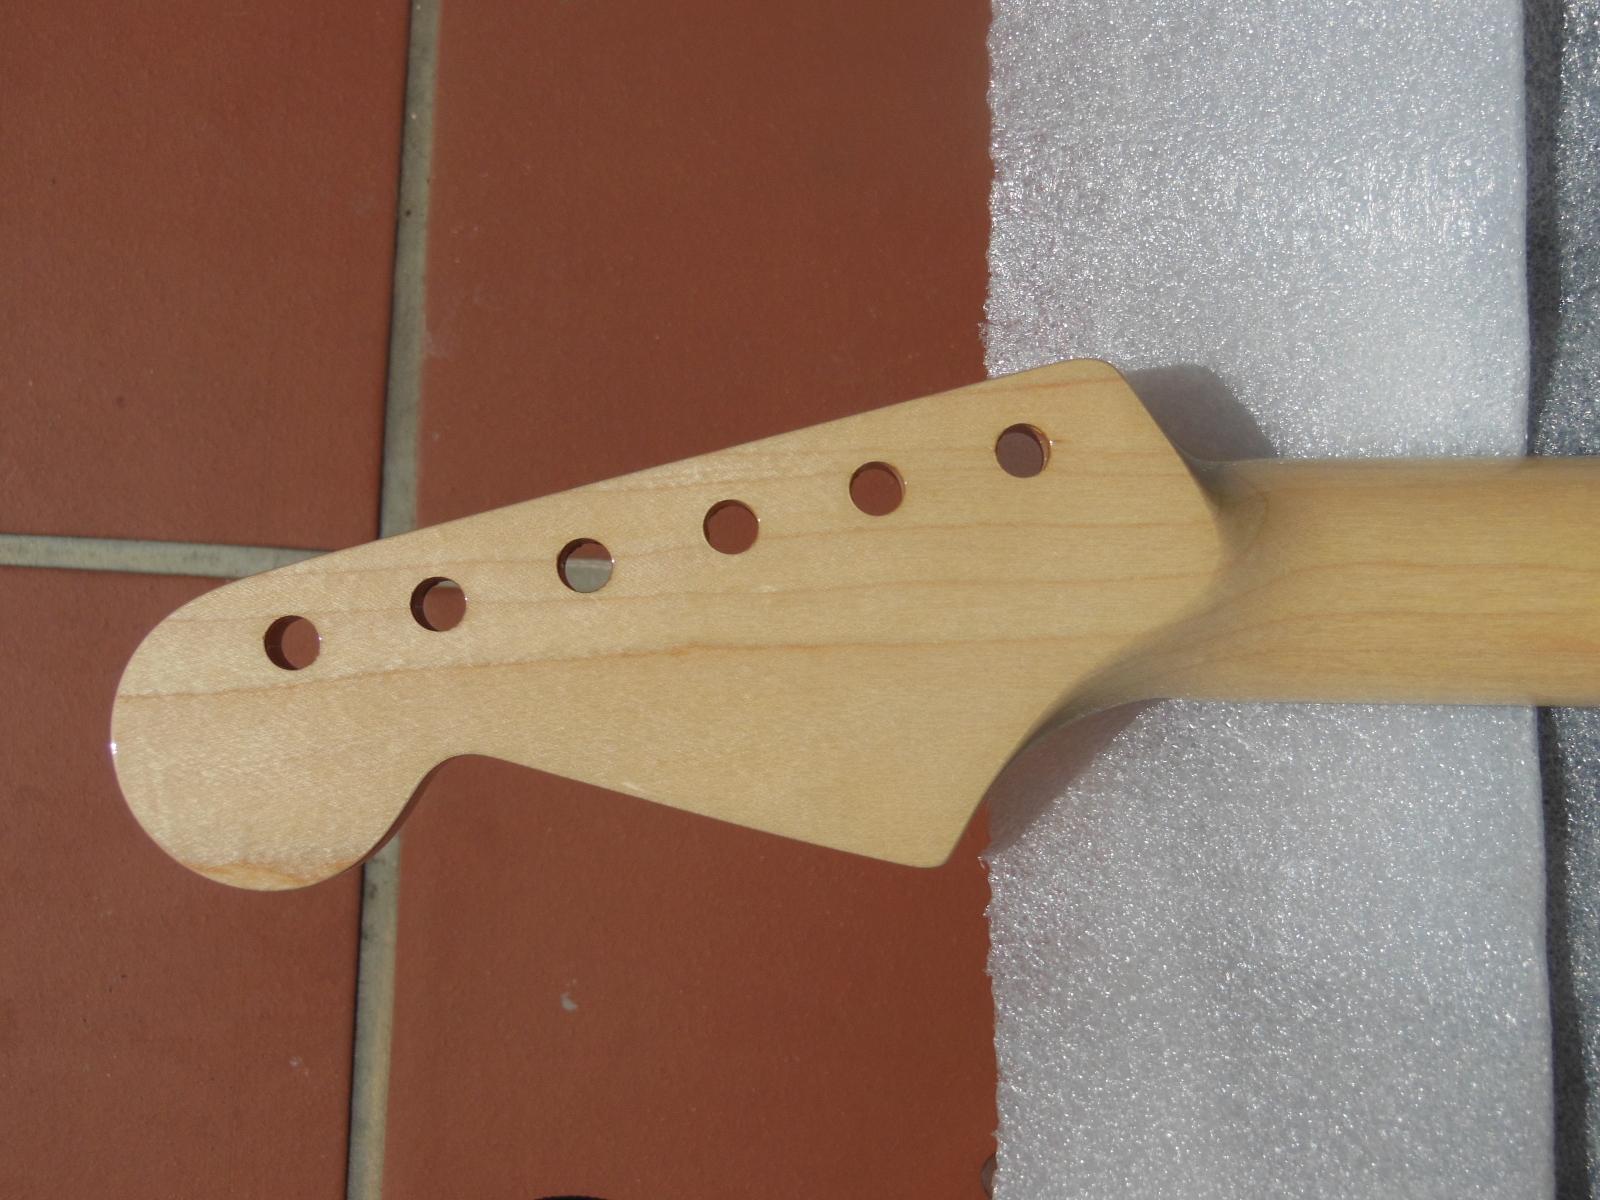
No truss rod hole at the headstock:

This is Indian rosewood (not Brazilian, obviously), but still very beautiful and has a very interesting grain pattern:

Since this is a vintage style 2-piece neck, the truss rod is inserted underneath the rosewood fingerboard. No truss rod hole at the headstock and no walnut skunk stripe at the back (as there is one for 1-piece maple necks due to the need for routing a channel for the rod without the access via fingerboard):

I love the clear finish. Really brings out the best of the wood grain:

Next steps are to order some tuners (preferably Gotoh vintage locking), vintage trem unit, and then start thinking about other hardware parts. I'm thinking of ordering a mint green 60s style pickguard with the truss rod notch (a little notch cut in the pickguard to give slightly more access to the truss rod at the neck heel), and probably white hardware (as opposed to aged white), but we'll see. I'm taking this project nice and slow to think about all the possibilities and all the things that may change.

Sunday, August 25, 2013

The Completed Stratocaster

Some late afternoon shots:

I like how clean the pickguard looks.

Nice deep vintage-style contours.

Some morning shots:

Outdoors, under the shade:

The color in these pictures are a bit more accurate. For whatever reason, the body looks really orange in the sunlight (not a bad thing) but the color seems to change drastically as the light changes.

I got a nice SKB case for the Stratocaster.

When I first began building, I was worried about the gap between the neck pocket and the body, but it ended up being pretty snug. I later found out the gap wasn't a huge issue anyway.

I really like how everything looks when it's all together.

This has been a really interesting experience and I'm really happy with the results. I did run into some problems and made some mistakes along the way, but I learned a lot from this build. I'm already thinking about building another Stratocaster in a more vintage style (7.25 inch fretboard radius, thick neck, single-ply pickguard, etc) but I'm going to wait until maybe next year before spending the money for yet a new guitar.

In the meantime, I've been playing the Stratocaster and getting used to the single-coil sound. I've got a Schecter C-1+ that I got a couple years ago that I really like, but it (and my Washburn) both have humbucking pickups (2 coils rather than 1, but they don't produce noise like single-coils do), which work for rock and metal but can't do some of the lighter stuff. The Schecter is nice since it has coil tap, which supposedly produces single-coil-like tone, but when I play the guitars back to back, there's a huge difference in tone.

This is the first time I've worked with single coils in a large amount, and I've been busy tweaking my amplifier and my pedals to find some great sounds. The DiMarzio Area pickups have been great, giving me a taste of the Stratocaster tone without producing any of the hum that's associated with single-coil pickups.

Anyway, I'll continue playing and tweaking and I'll put up some sound demos soon!

Saturday, August 24, 2013

Final Assembly

I spent the past 2 weeks on final assembly. The biggest part of it ended up being the soldering of the electronics and then the drilling of a few more holes for a couple more things.

After I attached the neck to the body and put on some strings, I decided to clean the finish off the frets. On all-maple necks, the finish is sprayed over the fretboard and covers the frets as well. I did some quick setup of the action (string height + a bit of intonation) before I realized that the finish on the frets would interfere with setup.

The left side shows some frets that don't have any finish left, while the right side shows peeling finish from the frets. I ended up having to use a sharp blade to score the base of the fret in order to expose the fret itself. This helped in making the finish easier to remove.

In the meantime, my DiMarzio Area pickups had arrived:

These DiMarzio pickups ended sounding pretty good. The reason why I decided to get these is because they're noiseless pickups (regular single coil pickups hum at 60 Hz which really makes it hard to record direct).

The next few days, I prepared my soldering equipment and started wiring. The first step was to install the components into the pickguard.

I braided the pickup wires in preparation for securing the wires together neatly.

I used latex surgical tubing to provide some tension for the pickup mounting screws (so that height adjustment can be done easily and the pickup can be secured) rather than the regular springs because I didn't want any rattling inside of the guitar while I play.

The potentiometer closest is the no-load pot from Fender. Up until 10, the pot will regulate tone until it hits 10, at which point the knob will "click" and remove itself from the circuit. Traditionally that knob is set up to control the tone for the middle pickup, but I decided I wanted the option to have the bridge also controlled. The problem was that I also wanted the option to take the tone control out of the circuit for the bridge pickup when I wanted the more traditional sound (which is with the bridge pickup not even wired to a tone pot).

The 0.022 μF Orange Drop capacitor (which is used for controlling the tone) right next to the pickguard.

Front of the pickguard. I decided that I wanted a very clean-looking white with all the components white as well. I think this is a really clean, modern, and standard look which I find is elegantly understated.

When it came time to solder, I had to practice a little bit first since I hadn't soldered for a long time (and the last time I did it, the joints were pretty terrible). I prepared by watching a bunch of videos on YouTube on how to properly solder.

The soldering ended up being not as bad as I thought, but soldering to the back of the pots was really difficult. The solder had a hard time melting since the pot acted as a big heat sink and didn't get quite hot enough for the solder. I ended up having to get a 60 watt soldering iron (rather than the 25 watt that I had) in order to redo the pots the next day. The 60 watt iron melted the solder really quickly and produced pretty nice solder joints.

I ended up using cloth-covered wires for most of the work and I think it's a lot easier to work with that type of wire rather than the modern plastic-covered kind, mainly because the cloth-covered wire has a fairly solid length of wire that's easy to move around and bend. No need for stripping the wire and twisting individual strands together.

After soldering, I spent about an hour cutting up copper shielding tape and then covering the cavities in the body. This produces a Faraday cage to prevent electromagnetic interference from generating noise in the circuit.

At this point, I had worked a couple of hours already, but I was determined to finish the guitar. I unscrewed the neck from the body so that I could put in the pickguard to get the right spacing for drilling its holes (since the neck has 22 frets instead of 21, I have to remove the neck whenever I want to move the pickguard). Once I put the pickguard back on, I screwed back on the neck and put the strings back in so I could wiggle the pickguard to ensure that I got good spacing for the strings to the pickups.

By this point, the guitar was looking very close, so I couldn't help but get some pictures of it before I ran out of sunlight.

I moved the pickguard around to find a good position so that the strings would pass over the pole pieces of the pickups. The spacing and position turned out to be just right.

I then proceeded to drill pilot holes for the pickguard, and I ended up just freehanding them right through the pickguard holes with a 1/16 inch brad point bit. For each hole, I first ran the drill in reverse and pressed down into the body after centering the bit in the hole, and once I had a fairly deep enough mark, I set the drill forward and then drilled down.

After I was done, I removed the neck yet again so I could open the pickguard and do the final soldering of the input jack connection and two ground connections (one to the shielding and one to the tremolo claw).

Connected!

By this time, it was beginning to get dark so I soldered the connections to the output jack, and then slowly began the process of installing each screw to each pilot hole in the pickguard and the output jack.

The final step was reinstalling the neck back on. At that point, I had a working Stratocaster!

The past week since the build was done has been devoted to setup of the action and intonation. I didn't end up having to adjust the neck truss rod, but I've been slowly getting the string heights to what I like and feel comfortable with. I haven't had time to get some pictures of the finished Strat throughout the week, but I just got a couple of shots today in the late afternoon. I'll post them up soon with some morning shots that I'll probably take tomorrow morning.

The final assembly was very tedious, but when I got that first note to sound from the amp, I knew that this had been all worth it.